
 Sign In
 Create Account
Only an Inch difference ?

Eibach Pros....
Started By
T-800
, Jul 11 2018 06:47 PM
101 replies to this topic
#21

 Posted 21 July 2018 - 09:57 PM
Roy
-

- Valued Member
-

- 5,507 posts
Resident Nardo Hater
- LocationYellow is the new Black
 Back to top
 Quote
Quote MultiQuote
#22
Posted 21 July 2018 - 10:27 PM
RS3Dell
-

- Valued Member
-
- 4,820 posts
Elite Club Member
- LocationToo close to Roy.

#23
Posted 24 July 2018 - 04:51 PM
Penetrator
-

- Valued Member
-
- 39 posts
Member
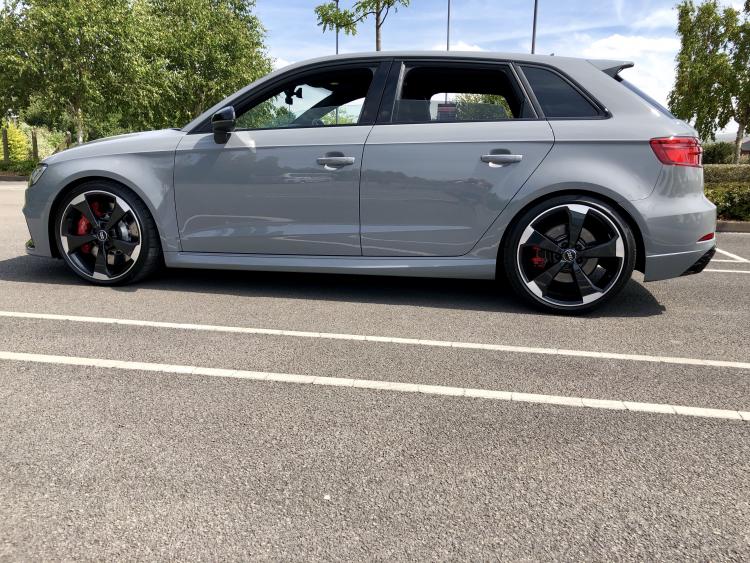
Just fitted the Eibach pro kit yesterday to my FL RS3 Sportback and it looks great. Definitely worth it and it’s a cheap upgrade.
Edited by Penetrator, 24 July 2018 - 04:54 PM.
#24
Posted 24 July 2018 - 07:41 PM
Tippytoes
-

- Valued Member
-
- 470 posts
Valued Club Member
- LocationEast Sussex
Just fitted the Eibach pro kit yesterday to my FL RS3 Sportback and it looks great. Definitely worth it and it’s a cheap upgrade.
Any photos?
#25
Posted 27 July 2018 - 08:28 PM
Penetrator
-
- Valued Member
-
- 39 posts
Member
#26
Posted 27 July 2018 - 08:29 PM
Penetrator
-
- Valued Member
-
- 39 posts
Member

#27
Posted 27 July 2018 - 08:35 PM
Penetrator
-
- Valued Member
-
- 39 posts
Member

#28
Posted 27 July 2018 - 11:47 PM
Tippytoes
-
- Valued Member
-
- 470 posts
Valued Club Member
- LocationEast Sussex
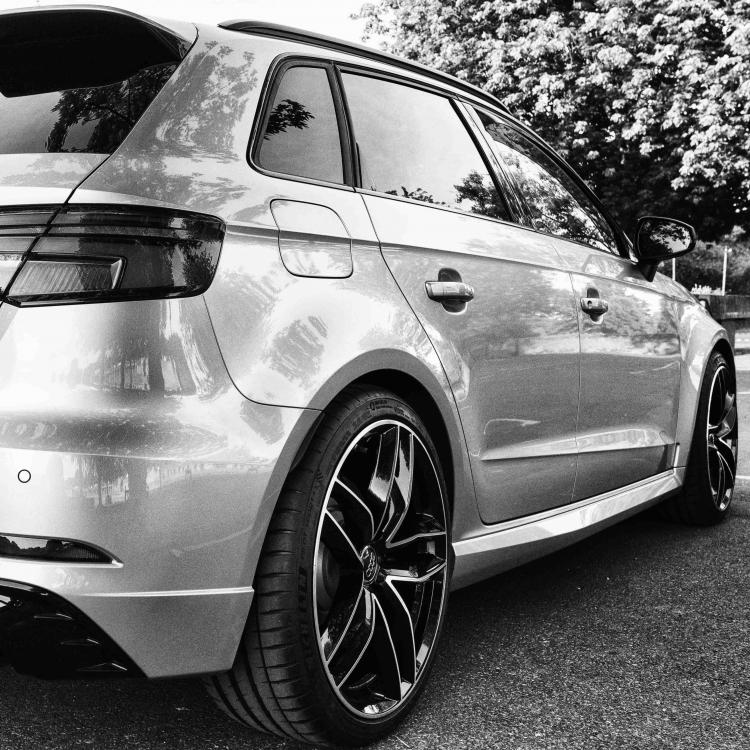
Thanks for photos P - looks good. Do you have mag ride? If so does front bottom out when in comfort mode?
#29
Posted 28 July 2018 - 08:00 AM
Audi s1
-

- Valued Member
-
- 27 posts
Member
#30
Posted 28 July 2018 - 09:45 AM
Fivepotfan
-

- Valued Member
-
- 868 posts
Valued Club Member
- LocationSouth of somewhere
Just fitted the Eibach pro kit yesterday to my FL RS3 Sportback and it looks great. Definitely worth it and it’s a cheap upgrade.
Did you fit it yourself or get a workshop to do it? Just wanted to know how long it takes as I getting some silly quotes to fit a set to my car.
now driving a 'Daytona Lite' FL car.
#31
Posted 28 July 2018 - 10:20 AM
RS3Dell
-
- Valued Member
-
- 4,820 posts
Elite Club Member
- LocationToo close to Roy.
Did you fit it yourself or get a workshop to do it? Just wanted to know how long it takes as I getting some silly quotes to fit a set to my car.
Brian.
Not hard just a few hours work in a garage or a morning on the drive.
Magride will need recalibrating afterwards mate.
Dell.
#32
Posted 28 July 2018 - 10:31 AM
T-800
-
- Valued Member
-
- 11,962 posts
Elite Club Member
Brian.
Not hard just a few hours work in a garage or a morning on the drive.
Magride will need recalibrating afterwards mate.
Dell.
Agree Del.....
When i finally get around to fitting mine i'm gonna let them settle a while.... then do 2 things
1) full geometry set up
2) Mag ride reset (because i have Odis and know a man that can connect me up remotely)
Edited by T-800, 28 July 2018 - 10:31 AM.
#33
Posted 28 July 2018 - 05:55 PM
Roy
-
- Valued Member
-
- 5,507 posts
Resident Nardo Hater
- LocationYellow is the new Black
#34
Posted 28 July 2018 - 06:14 PM
T-800
-
- Valued Member
-
- 11,962 posts
Elite Club Member
Would that be the wizard Alex
From V,A,G coding per chance ??
Never heard of V,A,G Coding

Are they new ?
#35
Posted 29 July 2018 - 08:32 AM
Tippytoes
-
- Valued Member
-
- 470 posts
Valued Club Member
- LocationEast Sussex
V,A,G, also known as Veritas, Amplus, Gonads - roughly taken to mean trully large gonads and usually applied to companys that make a balls up of things. Not to be confused with VAG.
#36
Posted 29 July 2018 - 09:06 AM
Tippytoes
-
- Valued Member
-
- 470 posts
Valued Club Member
- LocationEast Sussex
Sorry for the delay lol
AC48E5D8-A872-4E06-8345-55E52061B0C8.jpeg
Comparing the photo of your car with mine which has OEM springs I'm not sure there's enough clearance to lower front by 20mm & rear by 10mm and allow for a + 5mm ish tolerance?

#37
Posted 29 July 2018 - 01:27 PM
Roy
-
- Valued Member
-
- 5,507 posts
Resident Nardo Hater
- LocationYellow is the new Black
Tipp
those wheels,those wheels cant stop looking at them .
Waiting for Mr postman to bloody hurry up ! 
#38
Posted 31 July 2018 - 08:21 AM
Audi s1
-
- Valued Member
-
- 27 posts
Member
I just bought the eibach pro kit and the H&R rear arb..Sweet
Waiting for delivery and placement ..
#39
Posted 05 August 2018 - 04:00 PM
BenTTU
-

- Valued Member
-
- 548 posts
Valued Club Member
- LocationTamworth
#40
Posted 05 August 2018 - 05:10 PM
T-800
-
- Valued Member
-
- 11,962 posts
Elite Club Member
Fitting commenced yesterday afternoon
Fronts first
Remove wheel
Undo MagRide connector at the bottom of strut

Unbolt MagRide level sensor from wish bone arm to avoid over extending it.....

Undo Drop link top bolt where it’s connected to the strut
Jack up the whole strut / brake assembly from under the ball joint behind the brake disc, a piece of wood between the jack and metal is good for protection.
Once jacked up you can push the drop link stud back out of its hole...

Undo the hub nut / bolt

Locate the groove in the rear of the hub and insert spreader
Put spreader in the top part of hub first as this allows the strut to come out part way until the strut ‘tab’ hits the spreader, then remove spreader and insert in bottom part of hub and again ‘spread’ the slot, strut will now come all the way out
Picture below is with strut removed for clarity but gives you an idea

Once you have strut bottom out the hub you can go into the engine bay and remove the rubber seal to reveal the 3 top mount bolts

Once you undo these the strut assembly will be free to remove from the car.
Note about above.......
Be careful once the strut is free of the hub housing, because then you’ll find the brake disc / caliper weight will want to make the hub ‘tilt’ towards you, a potential hazard here is that you can pop a drive shaft out of its bearing cage, which is an inconvenience to say the least
To stop this get your second trolley jack (an extra pair of hands helps here) gently jack the bottom of the brake disc (using wood etc to protect it))
What’ll happen is the assembly will tilt slightly inwards, thus stopping any awkward drive shaft incidents.
Once you’ve undone the 3 top bolts the strut can be withdrawn.

Make sure you are familiar with the way the top mount bearing goes (take a picture if need be) there’s 2 arrows stamped into the rubber that indicate direction of travel and these go closest to the engine.

Attach your spring compressor and do the compressing until you can feel the spring tension come loose
https://uploads.tapa...85fdcd4337.heic
Then you can counter hold the strut nut / Allen key centre and undo

Once undone you can carefully remove the top rubber bush/bearing and strut concertina sleeve.
Be careful as the Bush / bearing can separate, but is easy to put back together as there is a locating notch.
Remove old compressed spring and take the compressor off it carefully...
https://uploads.tapa...f04c3154899.jpg
Compress new spring and reverse the procedure you just did.
Pay attention to the spring location in the strut flange, it sits in a foam insert and locates against an end stop at the base....
Once you’ve fitted the new spring and tightened down the top bearing etc.....you can insert the strut assembly back into the car, taking care to get the rubber mount in the correct orientation.....
Locate the 3 top bolts in the engine bay and leave them a ‘little’ loose so you can still move the strut around...
Now the fun part
I used some spray Copper grease in the hub collar to aid refitting..
https://uploads.tapa...ac5811368f1.jpg
You need to push down on the hub / brake etc enough to allow the strut back into the hole, it’s do-able on your own....just but again you need to be mindful of the driveshaft scenario and if your not really really careful a popped out driveshaft will give you a severe headache 
Best advice I can give is get someone who can position the strut end while you push down on the hub / wishbone / brake etc.
Below is the ‘tab’ that located in the hub groove that you spread open, you can also see the yellow mag ride connector.
https://uploads.tapa...e174644be0d.jpg
Once located you can reposition your second jack and slowly push up from under the wishbone, using the wood etc to prevent damaging anything.
You’ll have to reverse the procedure you used with the hub spreader to ensure smooth locating, so have the spreader at the bottom of the groove, the strut will slide in until the locating tab hits the spreader, then remove the spreader and insert at the top of the groove and ‘spread’ again, you should be able to ‘jack’ and the strut will bang home, once you are satisfied it’s all the way in (look at the strut you’ll see a line where the paint is clearly unmarked) remove spreader.
insert the bolt and screw the nut on it, then tighten them, you’ll need a spline for the bolt head and an 18mm socket for the nut.
https://uploads.tapa...a43ba341ccb.jpg
Whilst it’s under load re-insert the drop link and screw on the nut then tighten up.
Remove 2nd jack then tighten up the 3 top mount bolts in the engine bay.
Re-attach the mag ride strut connector and level sensor
Check over everything then put the rubber seal back in the engine bay that you removed to access the strut top bolts.

Wheel back on.
Rears write up to follow
Fronts first
Remove wheel
Undo MagRide connector at the bottom of strut
Unbolt MagRide level sensor from wish bone arm to avoid over extending it.....
Undo Drop link top bolt where it’s connected to the strut
Jack up the whole strut / brake assembly from under the ball joint behind the brake disc, a piece of wood between the jack and metal is good for protection.
Once jacked up you can push the drop link stud back out of its hole...
Undo the hub nut / bolt
Locate the groove in the rear of the hub and insert spreader
Put spreader in the top part of hub first as this allows the strut to come out part way until the strut ‘tab’ hits the spreader, then remove spreader and insert in bottom part of hub and again ‘spread’ the slot, strut will now come all the way out
Picture below is with strut removed for clarity but gives you an idea
Once you have strut bottom out the hub you can go into the engine bay and remove the rubber seal to reveal the 3 top mount bolts
Once you undo these the strut assembly will be free to remove from the car.
Note about above.......
Be careful once the strut is free of the hub housing, because then you’ll find the brake disc / caliper weight will want to make the hub ‘tilt’ towards you, a potential hazard here is that you can pop a drive shaft out of its bearing cage, which is an inconvenience to say the least
To stop this get your second trolley jack (an extra pair of hands helps here) gently jack the bottom of the brake disc (using wood etc to protect it))
What’ll happen is the assembly will tilt slightly inwards, thus stopping any awkward drive shaft incidents.
Once you’ve undone the 3 top bolts the strut can be withdrawn.
Make sure you are familiar with the way the top mount bearing goes (take a picture if need be) there’s 2 arrows stamped into the rubber that indicate direction of travel and these go closest to the engine.
Attach your spring compressor and do the compressing until you can feel the spring tension come loose
https://uploads.tapa...85fdcd4337.heic
Then you can counter hold the strut nut / Allen key centre and undo
Once undone you can carefully remove the top rubber bush/bearing and strut concertina sleeve.
Be careful as the Bush / bearing can separate, but is easy to put back together as there is a locating notch.
Remove old compressed spring and take the compressor off it carefully...
https://uploads.tapa...f04c3154899.jpg
Compress new spring and reverse the procedure you just did.
Pay attention to the spring location in the strut flange, it sits in a foam insert and locates against an end stop at the base....
Once you’ve fitted the new spring and tightened down the top bearing etc.....you can insert the strut assembly back into the car, taking care to get the rubber mount in the correct orientation.....
Locate the 3 top bolts in the engine bay and leave them a ‘little’ loose so you can still move the strut around...
Now the fun part
I used some spray Copper grease in the hub collar to aid refitting..
https://uploads.tapa...ac5811368f1.jpg
You need to push down on the hub / brake etc enough to allow the strut back into the hole, it’s do-able on your own....just
but again you need to be mindful of the driveshaft scenario and if your not really really careful a popped out driveshaft will give you a severe headache Best advice I can give is get someone who can position the strut end while you push down on the hub / wishbone / brake etc.
Below is the ‘tab’ that located in the hub groove that you spread open, you can also see the yellow mag ride connector.
https://uploads.tapa...e174644be0d.jpg
Once located you can reposition your second jack and slowly push up from under the wishbone, using the wood etc to prevent damaging anything.
You’ll have to reverse the procedure you used with the hub spreader to ensure smooth locating, so have the spreader at the bottom of the groove, the strut will slide in until the locating tab hits the spreader, then remove the spreader and insert at the top of the groove and ‘spread’ again, you should be able to ‘jack’ and the strut will bang home, once you are satisfied it’s all the way in (look at the strut you’ll see a line where the paint is clearly unmarked) remove spreader.
insert the bolt and screw the nut on it, then tighten them, you’ll need a spline for the bolt head and an 18mm socket for the nut.
https://uploads.tapa...a43ba341ccb.jpg
Whilst it’s under load re-insert the drop link and screw on the nut then tighten up.
Remove 2nd jack then tighten up the 3 top mount bolts in the engine bay.
Re-attach the mag ride strut connector and level sensor
Check over everything then put the rubber seal back in the engine bay that you removed to access the strut top bolts.
Wheel back on.
Rears write up to follow
Edited by T-800, 05 August 2018 - 05:13 PM.
Reply to this topic


